簡易的比特幣錢包管理與公私鑰概念調查 (Bitcoin wallet management and basic keys/addresses survey)
Introduction
大家好,我最近開始學習區塊鏈的技術,先粗略研究了比特幣錢包中相關公私鑰與地址的概念,以及自由在各平台錢包之間轉移既有的帳號(公私鑰對)。與各位有需要的朋友們分享心得,希望可以幫助到您們。若內容有任何錯誤或者問題,也請您們不吝賜教,非常感謝。
I started to study blockchain recently and try to figure out concepts about the keys, addresses which related to the bitcoin wallet. Meanwhile, I also collect some methods to easily export/import the existing key pairs among different wallets and platforms. I want to share my experiences with you. And please leave me some comments if you have any question or have found some misleading information via this post 🙂
大致將心得分成以下數個部分:
- 從比特幣客戶端錢包匯出公私鑰地址
- 經由各種不同加密演算法流程驗證金鑰與了解成因
- 建立客製化的公私鑰地址
- 將客製化公私鑰地址匯入錢包
This is the TOC and I only translate some of them since all the others are not essential part of this topic. And, forgive my weakness translation as usual…..
- Exporting the private/public address pairs from wallet
- Verifying address pairs to understand the calculation flow to the keys
- Creating the customized private/public address pairs
- Importing the customized private/public address pairs into wallet
1. 比特幣客戶端錢包匯出公私鑰地址 (Exporting the private/public address pairs from wallet)
1.1.
Download pywallet, bitcoinj and install
1.2.
從不同客戶端軟體備份錢包,本文會處理「bitcoin-qt」以及「Bitcoin Wallet」這兩種格式的錢包,前者的檔案名稱為 wallet.dat ,後者的檔案名稱格式為 bitcoin-wallet-backup-YYYY-MM-DD
Backup wallet file from different clients, both bitcoin-qt and Bitcoin Wallet is goind to be introduced in this article. Wallet from the first client is named wallet.dat , and wallet from the second client is named bitcoin-wallet-backup-YYYY-MM-DD
1.3.1. bitcoin-qt
安裝好 pywallet 並且準備好 wallet.dat 之後請執以下指令,參數請依自己的環境而修改,之後得到 result.json
Fire the following command after installing pywallet and preparing wallet.dat , and change the parameter to suit the environment. Finally get result.json
./pywallet.py –password=xxxxxxxx –datadir=/path –dumpwallet > result.json
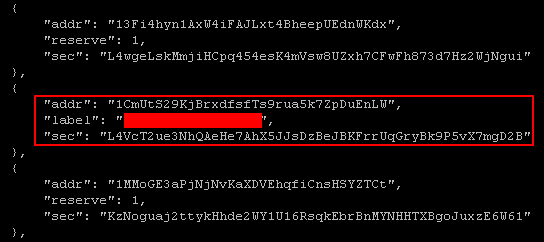
這是 result.json 大概的架構,只需要拷貝出有 “label” 段落的 “sec” 與 “addr” 的兩個欄位值就可以了,L4VcT2ue3NhQAeHe7AhX5JJsDzBeJBKFrrUqGryBk9P5vX7mgD2B、1CmUtS29KjBrxdfsfTs9rua5k7ZpDuEnLW,前者是私鑰地址,後者是公鑰地址
This is part of result.json , copy the value of “sec” and “addr” tags nearby the “label” tag, which is L4VcT2ue3NhQAeHe7AhX5JJsDzBeJBKFrrUqGryBk9P5vX7mgD2B and 1CmUtS29KjBrxdfsfTs9rua5k7ZpDuEnLW , the first is private address and the second one is public address
1.3.2. Bitcoin Wallet
安裝好 bitcoinj 並且準備好 bitcoin-wallet-backup-YYYY-MM-DD 之後請執以下兩個指令,參數請依自己的環境而修改,之後得到 result.txt (以及第四小節會用到的 bitcoin-wallet-backup-YYYY-MM-DD.ptb)
Fire the following 2 commands after installing bitcoinj and preparing bitcoin-wallet-backup-YYYY-MM-DD , and change the parameter to suit the environment. Finally get result.txt (and bitcoin-wallet-backup-YYYY-MM-DD.ptb which will be used in section 4)
openssl enc -d -aes-256-cbc -a -in bitcoin-wallet-backup-YYYY-MM-DD -out bitcoin-wallet-backup-YYYY-MM-DD.ptb
./wallet-tool dump –dump-privkeys –wallet=/filepath/bitcoin-wallet-backup-YYYY-MM-DD.ptb > result.txt
這是 result.txt大概的架構,只需要拷貝出有 “ECKey->priv WIF” 與 “addr” 的兩個欄位值就可以了,前者是私鑰地址,後者是公鑰地址
This is part of result.txt, copy the value of “ECKey->priv WIF” and “addr” , the first is private address and the second one is public address

2. 經由各種不同加密演算法流程驗證金鑰與了解成因 (Verifying address pairs to understand the calculation flow to the keys)
請先來到這裡,在最上面的欄位中輸入上個小節匯出的私鑰地址 L4VcT2ue3NhQAeHe7AhX5JJsDzBeJBKFrrUqGryBk9P5vX7mgD2B ,並對照以下圖片進行說明
Please copy the private address dumped from the previous section: “L4VcT2ue3NhQAeHe7AhX5JJsDzBeJBKFrrUqGryBk9P5vX7mgD2B”, and paste on the first column of this link, and consider the following flowchart
2.1.
介紹各種演算法的說明、特色、以及應用場景:
All information, feature, and scenario from the related algorithm show below:
橢圓曲線演算法:它是一個有多種版本的非對稱加密演算法,在比特幣架構中使用的為 secp256k1 版,具有公私鑰加解密特性,也就是將明文加密的金鑰與密文解密用的金鑰是不相同的。可使訊息的收發者在保有各自私鑰、分享彼此公鑰的情況下,安全的傳輸訊息,除了可避免被第三方攔截解析之外,也可驗證訊息的來源與目的是否有問題
SHA:它是一個有多種版本的雜湊演算法,在比特幣架構中使用的為 SHA-256 版,現階段具有能抵禦碰撞攻擊的特性,加密過的訊息是不可逆的,通常被用來快速確認明文的正確性,以及核對訊息在傳輸過程中是否有漏失
RIPEMD:它的功能與特性大致同 SHA ,在比特幣架構中使用的為 RIPEMD160 版,由於 SHA-256 的輸出為 32 bytes 而 RIPEMD160 的輸出為 20 bytes ,因此比特幣用它來縮短雜湊訊息加速資料傳輸與驗證速度
Base58:它是一種可逆的編碼函數,相較 Base64 而言,去除了非字母符號以及容易讓人混淆的字元 (例如大寫 O 與數字 0) ,使得訊息更有可讀與可傳遞性
checksum: 它不是一種演算法,但在比特幣中卻是用來驗證公私鑰地址的正確性,類似檢查碼的概念,藉以證明這個公私鑰地址的確是由特定某一組公私鑰所製造
Elliptic Curve Cryptography (ECC): is one of the asymmetric encryption. A specific version knows as secp256k1 be used in Bitcoin. It allowed users to encode or decode messages via 2 different keys rather than 1. Thus, message senders and receivers could keep their own private keys and share all the public keys among them, such that all the messages could be transferred safely, and avoiding malicious sniffing/cracking behavior. Also, the identity between senders and receivers can be proven easily.
SHA: is one of the strong hashing function. A specific version knows as SHA-256 be used in Bitcoin. It currently could avoid collision attacks, and the output of this function is irreversible. It is usually used to check the correctness of a huge massage rapidly, and confirm the completeness of the transferring data quickly.
RIPEMD: is another hashing function like SHA. A specific version knows as RIPEMD160 be used in Bitcoin. Bitcoin use it hashing output (20 bytes) rather than SHA-256 (32 bytes) due to reduce the entire transferring traffic.
Base58: is one of the reversible encoding function. Rather than Base64, some similar-looking letters are omitted such as Capital O and number 0. It is designed for users who manually enter the data without misleading characters.
checksum: is technically not a single algorithm or a function, it’s a combination from them. All private/public keys from Bitcoin use it to verify the correctness of them. All private/public addresses use it to claim that there must be a specific key pairs have a 1-to-1 relationship between them.
2.2.
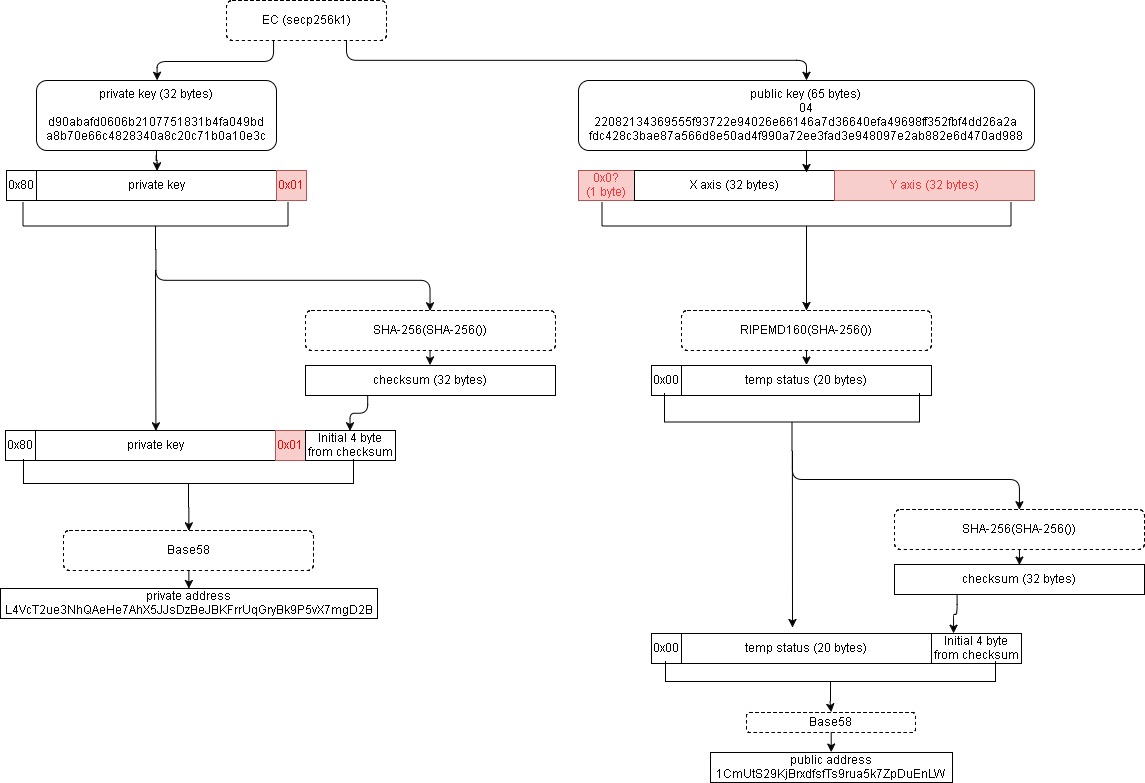
本範例嘗試從 private address 出發,接著還原出私鑰,再接著推導出公鑰,最後利用公鑰計算出 public address ,可以同步在這裡驗證整個過程,或者下載程式碼自行操作
We try to start from private address in this example, and use it to rebuild the private key. Then, use the private key to calculate the public key. Finally, use the public key to get the public address. Here shows the whole data flow and here is the source code
private address 經過 Base58 的還原編碼後,會變成 37 或 38 bytes 的字串,若為前者表示此公私鑰的加密方式採取非壓縮加密,也就是比特幣問世以來較初期的地址;若為後者表示此公私鑰採取壓縮方式加密,為了向前相容所以在編碼上如此設計。
還原後得到以 16 進制表示的 private address ,它由 4 個部分組成
- 1 byte 的固定常數 0x80 ,它用來區分不同區塊鏈協議下的位址 (例如比特幣測試網路為 0xEF)
- 32 bytes 的私鑰 (例如 d90abafd0606b2107751831b4fa049bda8b70e66c4828340a8c20c71b0a10e3c)
- 1 byte 的壓縮格式辨識符 0x01 ,若不存在代表沒有壓縮
- 4 bytes 的 checksum ,用來檢驗前 3 部份的正確性 (例如 515aba8c)
此時可以利用 checksum 驗證私鑰的正確性,只要把前 3 部份經過 2 次的 SHA-256 加密,之後再取最前面的 4 個 byte 與 checksum 核對是否一致即可,若為一致,則保證原始私鑰是正確的,可以橢圓曲線演算法利用私鑰推導出公鑰
公鑰是以 16 進制表示的 65 bytes 長度字串 ,它由 3 個部分組成
- 1 byte 的固定常數 0x04,它用來表示座標的呈現方式
- 32 bytes 的 X 軸座標 (例如 22082134369555f93722e94026e66146a7d36640efa49698ff352fbf4dd26a2a)
- 32 bytes 的 Y 軸座標 (例如 fdc428c3bae87a566d8e50ad4f990a72ee3fad3e948097e2ab882e6d470ad988)
為了使公鑰地址不可逆運算回公鑰本身,以及精簡地址傳輸的長度,此時就須要將整個公鑰的 3 部分進行 SHA-256 以及 RIPEMD160 加密,它也為非壓縮方式加密
而現今的公鑰格式普遍都採取壓縮方式加密,因此需要先行針對加密前的字串進行整理,它將是以 16 進制表示的 33 bytes 長度字串 ,且由 2 個部分組成
- 1 byte 的固定常數,內容隨著 Y 軸座標而不同,若 Y 軸座標為偶數,則填入 0x02 ,反之奇數則為 0x03 (例如 0x02 因為本範例的 Y 軸座標為偶數)
- 32 bytes 的 X 軸座標 (例如 22082134369555f93722e94026e66146a7d36640efa49698ff352fbf4dd26a2a)
無論有無壓縮,凡是進行過 SHA-256 以及 RIPEMD160 加密的字串都會變為 20 bytes (例如 8112f6f1ab1e4ba3737d252885606ffda96fec13)
接著再產生屬於這個公鑰的 checksum ,但在經過雜湊函數之前還需要額外做一次數據整理,由 2 個部分組成
- 1 byte 的固定常數 0x00 ,它用來區分不同區塊鏈協議下的位址 (例如比特幣測試網路為 0x6E)
- 20 bytes 的加密公鑰 (例如 8112f6f1ab1e4ba3737d252885606ffda96fec13)
需要經過 2 次的 SHA-256 加密,之後再取最前面的 4 個 bytes (例如 5df3e447)
最後,將上述 2 部份加上它的 checksum 組成一個 25 bytes 的字串,再經過 Base58 編碼過後則終於得到 public address (例如 1CmUtS29KjBrxdfsfTs9rua5k7ZpDuEnLW)
private address will turn into a string with 37 or 38 bytes after Base58 decode. The whole address encryption is in normal mode if the string length is 37 bytes, and compressed mode opposite (38 bytes). The compressed mode is a new address represend method that downward compatible with normal mode.
It represented the private address in HEX mode, is consist from 4 parts
- 1 byte for a constant 0x80, use to distinguish addresses among different blockchain networks (e.g., 0xEF for Bitcoin testnet)
- 32 bytes for private key (e.g., d90abafd0606b2107751831b4fa049bda8b70e66c4828340a8c20c71b0a10e3c)
- 1 byte for a flag 0x01 , use to notify that the compressed mode is be used. For normal mode, just skip this part
- 4 bytes for checksum, use to verify the correctness in the previous parts (e.g., 515aba8c)
Using checksum and verifying the correctness of the private key. It double hashed the first 3 parts of the private address with SHA-256, and pick the first 4 bytes and then compared with checksum. The correctness could be claimed if the comparison is matched, which also means a specific public key can be reproduced via this private key.
public key is a 65 bytes HEX string, and consist from 3 parts
- 1 byte for a constant 0x04, use to identify the coordinate mode in ECC
- 32 bytes for x-axis point (e.g., 22082134369555f93722e94026e66146a7d36640efa49698ff352fbf4dd26a2a)
- 32 bytes for y-axis point (e.g., fdc428c3bae87a566d8e50ad4f990a72ee3fad3e948097e2ab882e6d470ad988)
Due to piblic address is riirvertible and short, we have to hash the whole 3 parts of public key via SHA-256 and RIPEMD160 sequencially. And it’s in normal mode.
In compressed mode, we have to adjust some inputs before hashing. It is a 33 bytes HEX string, and consist from 2 parts
- 1 byte for a constant, the value is related to the y-axis point. Says 0x02 when y-axis is an even number, and 0x03 opposite (odd number)
- 32 bytes for x-axis point (e.g., 22082134369555f93722e94026e66146a7d36640efa49698ff352fbf4dd26a2a)
The output shall be a 20 bytes string no matter using which mode (e.g., 8112f6f1ab1e4ba3737d252885606ffda96fec13)
Then we have to generate the checksum toward to this public key. An extra adjustment shoud be applied before hashing, it consist from 2 parts
- 1 byte for a constant 0x00, use to distinguish addresses among different blockchain networks (e.g., 0x6E for Bitcoin testnet)
- 20 bytes for a encrypted public key generated before (e.g., 8112f6f1ab1e4ba3737d252885606ffda96fec13)
checksum will be generated by double SHA-256 hashing with a 4 bytes prefix cutting (e.g., 5df3e447)
Finally, we collect the whole 2 parts with checksum (totally 25 bytes), and put them to the Base58 encode method. The public address shows up (e.g., 1CmUtS29KjBrxdfsfTs9rua5k7ZpDuEnLW)
3. 建立客製化的公私鑰地址 (Creating the customized private/public address pairs)
3.1.
下載與安裝 vanitygen
Download vanitygen and install
3.2.
此程式的作用是不斷嘗試產生公私鑰對,並且對其使用第二小節的模式進行加密與雜湊,當最終的公鑰地址滿足用戶給定的前綴時任務就結束,用戶就可以使用客製化的公私鑰地址。另外隨著客製化前綴的位元變多,程式總執行時間也會呈指數增加。最後,由於公鑰地址為 base58 格式,加上比特幣位址的規定,指定前綴字串的首字元必須是 1 ,且其他字元也不能出現非 base58 規定的字元 (例如大寫 O 與數字 0)
安裝好 vanitygen 之後,請執以下指令,前綴參數請依自己的需求而修改,當一段時間程式找到滿足條件的公私鑰對時,就會直接顯示
This script keep generating random private/public key pairs and then applied some encrypting/hashing functions that mentioned in the previous section. Then it stop once the public address partially matched the given customized prefix string from user. Meanwhile, increasing the length from the prefix string may cause the entire execution time expand exponentially. Finally, there’s always a leading 1 in the prefix string and all remain chars must be included in base58 standards (e.g., not any Capital O and number 0)
Fire the following command after installing vanitygen , and change the custom prefix string. Finally get the result once the process is finished
./vanitygen 1Test
這是最終輸出,只需要拷貝出 “Privkey” 與 “Address” 的兩個欄位值就可以了,5Ke6EtdwNFgaUmPmcCmsyxq8igQ2yGdhxAztnpczNV2NjqoegVk、1TestEd9GHdpst9whpowh1MaKs6TpGSA8,前者是私鑰地址,後者是公鑰地址
This is result, copy the value of “Privkey” and “Address” tag, which is 5Ke6EtdwNFgaUmPmcCmsyxq8igQ2yGdhxAztnpczNV2NjqoegVk and 1TestEd9GHdpst9whpowh1MaKs6TpGSA8 , the first is private address and the second one is public address

4. 將客製化公私鑰地址匯入錢包 (Importing the customized private/public address pairs into wallet)
本例使用上一個段落所製造的私鑰地址匯入到錢包中,該公私鑰地址僅供練習用途,請勿拿來做任何財務操作。
All addresses in this example are only for experimental purpose, so do not use any one of them.
4.1. bitcoin-qt
安裝好 pywallet 並且準備好 wallet.dat 之後請執以下指令,參數請依自己的環境而修改,之後這個檔案就匯入完成可以直接使用了 (wallet.dat)
Fire the following command after installing pywallet and preparing wallet.dat , and change the parameter to suit the environment. Finally get the updated wallet file (wallet.dat)
./pywallet.py –password=xxxxxxxx –datadir=/path –importprivkey 5Ke6EtdwNFgaUmPmcCmsyxq8igQ2yGdhxAztnpczNV2NjqoegVk
4.2. Bitcoin Wallet
安裝好 bitcoinj 並且準備好 bitcoin-wallet-backup-YYYY-MM-DD.ptb 之後請執以下兩個指令,參數請依自己的環境而修改,之後這個檔案就匯入完成可以直接使用了 (bitcoin-wallet-backup-YYYY-MM-DD)
Fire the following 2 commands after installing bitcoinj and preparing bitcoin-wallet-backup-YYYY-MM-DD.ptb , and change the parameter to suit the environment. Finally get the updated wallet file (bitcoin-wallet-backup-YYYY-MM-DD)
./wallet-tool add-key –privkey=5Ke6EtdwNFgaUmPmcCmsyxq8igQ2yGdhxAztnpczNV2NjqoegVk –wallet=/filepath/bitcoin-wallet-backup-YYYY-MM-DD.ptb
openssl enc -aes-256-cbc -a -in bitcoin-wallet-backup-YYYY-MM-DD.ptb -out bitcoin-wallet-backup-YYYY-MM-DD
PS
這個概念可以再更深入探討到後續的 BIP 、 HD 錢包等等,有興趣的朋友可以來這裡看
Concepts of bitcoin wallet is more complicated than the introduction in this article, you can check this for detail such as BIP, HD, and etc.
References
https://github.com/bitcoinbook/bitcoinbook/blob/first_edition/ch04.asciidoc
https://en.bitcoin.it/wiki/Technical_background_of_version_1_Bitcoin_addresses
https://en.bitcoin.it/wiki/Wallet_import_format
https://github.com/joric/pywallet
https://github.com/bitcoinj/bitcoinj
https://github.com/samr7/vanitygen
https://github.com/theringe/blockchain-learning-tools
http://blockchain-learning-tools.mohohan.com/bitcoin-address-verifier.html
請問checksum為什麼要兩次的sha256這有什麼含意呢?
您好,我查到了這篇文章,他提到一次或兩次sha其實就安全性來說是等價的,只是中本提出這個概念時sha-256好像才剛出,大概是擔心安全性風險吧(雖然已證明等價),若有其他理解錯誤也請指正喔,感謝。
https://www.quora.com/Why-is-the-checksum-of-the-bitcoin-address-is-generated-by-hashing-twice-not-once